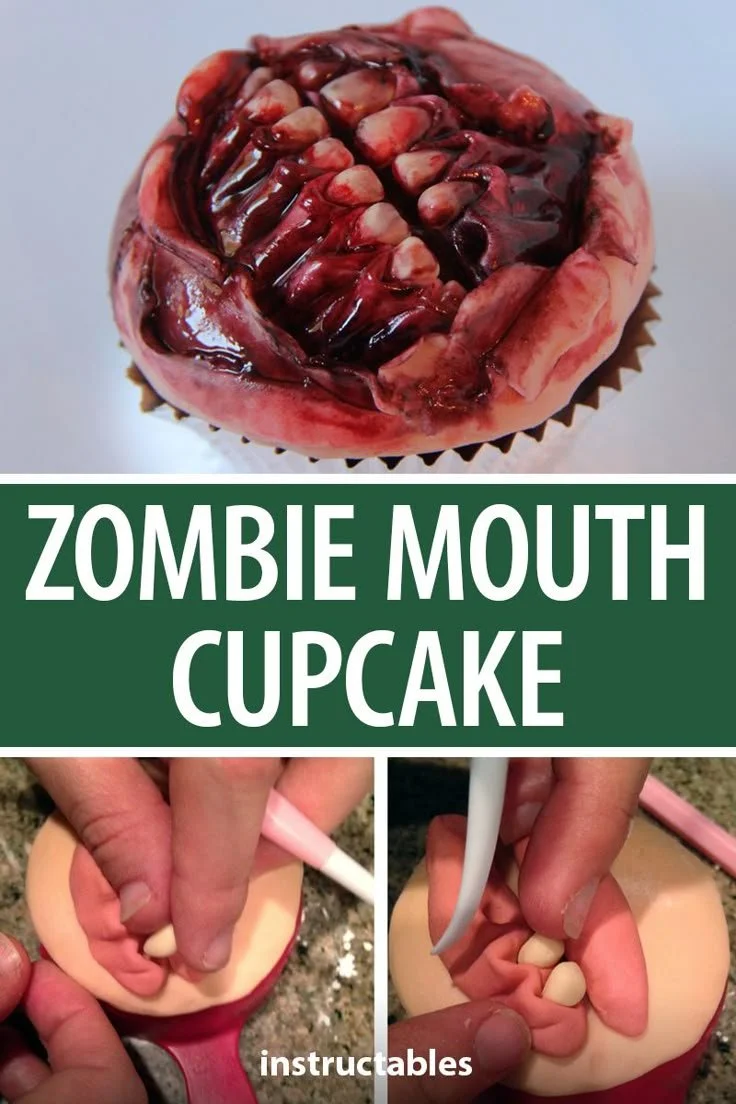
Zombie Mouth Cupcakes are a fun and delicious treat perfect for Halloween gatherings or spooky celebrations. These cupcakes not only look delightfully eerie with their fondant decorations, but they also have a rich, fluffy texture that will keep your guests coming back for more. You’ll love how easily you can create these creepy treats that blend fun and flavor seamlessly.
Why You’ll Love Zombie Mouth Cupcakes
- Fun and Festive: These cupcakes are perfect for Halloween parties or any spooky-themed gatherings, adding a playful element to your dessert table.
- Easy to Make: The recipe is straightforward, making it ideal for beginner bakers who want to impress friends and family without spending hours in the kitchen.
- Delicious Flavors: With a soft, buttery base and sweet toppings, these cupcakes satisfy any sweet tooth while still looking ghoulishly charming.
- Customizable Decorations: While the zombie mouths are fun, feel free to experiment with different designs for other occasions using the same base recipe, making it versatile for various celebrations.
- Interactive Cooking Experience: Decorating the cupcakes can be a fun activity for kids and adults alike, perfect for family bonding time while being creative in the kitchen.
Recipe Overview
- Prep Time: 20 minutes
- Cook Time: 18-20 minutes
- Total Time: 40-45 minutes
- Servings: 12 cupcakes
- Difficulty Level: Easy
Ingredients You’ll Need for Zombie Mouth Cupcakes
-
Cupcake Base:
- 1 cup all-purpose flour
- 1/2 cup sugar
- 1/2 cup unsalted butter, softened
- 2 eggs
- 1/2 cup milk
- 1 teaspoon vanilla extract
- 1 teaspoon baking powder
- 1/4 teaspoon salt
-
Decoration:
- Fondant for decoration
- Red food coloring for blood
Notes:
- The all-purpose flour provides a tender crumb, while the sugar adds sweetness.
- Feel free to substitute the unsalted butter with a dairy-free alternative if needed.
- The fondant can be flavored if you want an extra twist to the decorations.
How to Make Zombie Mouth Cupcakes
-
Preheat Oven and Prepare Tin
Preheat your oven to 350°F (175°C) and line a cupcake tin with paper liners to keep the cupcakes from sticking. -
Cream Butter and Sugar
In a mixing bowl, cream together the softened butter and sugar until the mixture becomes light and fluffy. This usually takes about 3-5 minutes. -
Add Eggs and Wet Ingredients
Add the eggs one at a time, mixing well after each addition. Stir in the milk and vanilla extract, ensuring the mixture is smooth. -
Mix Dry Ingredients
In another bowl, combine the flour, baking powder, and salt. Whisk them together to evenly distribute the leavening and salt. -
Combine Mixtures
Gradually add the dry ingredients to the wet mixture, stirring until just combined. Avoid overmixing to keep the cupcakes light and fluffy. -
Fill Cupcake Liners
Divide the batter evenly among the lined cupcake cups, filling each about two-thirds full to allow for rising. -
Bake the Cupcakes
Bake in the preheated oven for 18-20 minutes or until a toothpick inserted into the center comes out clean. Let them cool in the tin for a few minutes before transferring to a wire rack to cool completely. -
Decorate with Fondant
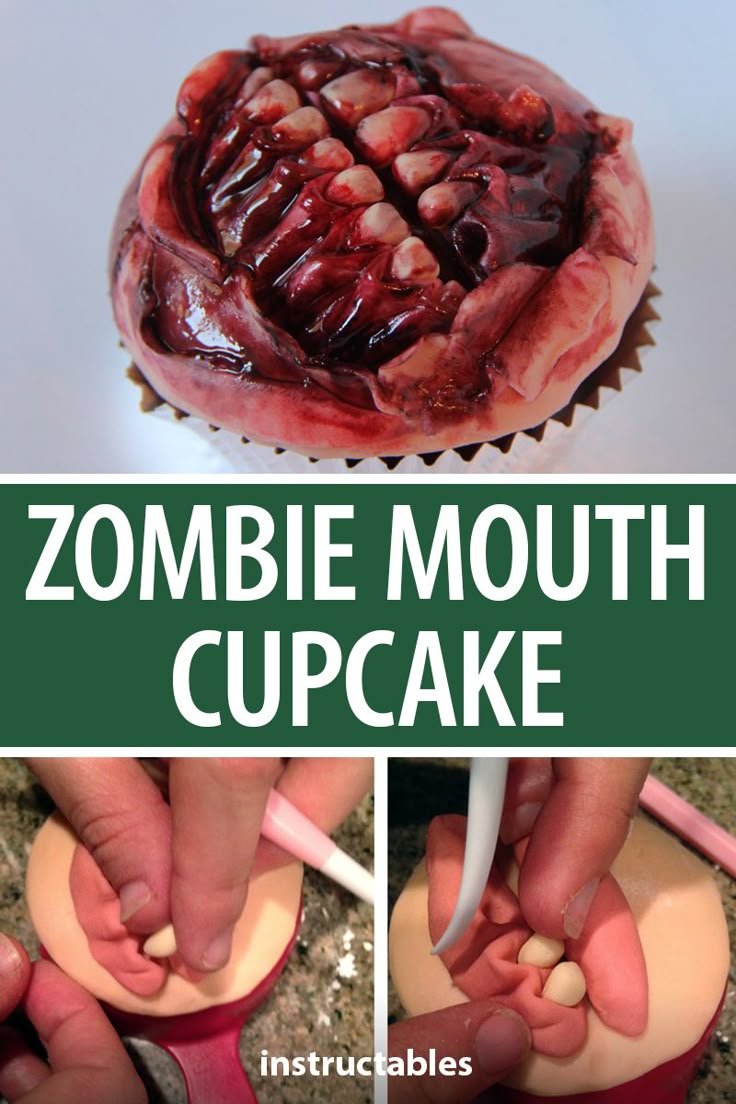
While the cupcakes cool, prepare the zombie mouths by shaping small pieces of fondant to create lips and teeth. -
Add the Spooky Drizzle
Once the cupcakes are completely cool, top them with the fondant mouth decoration and drizzle with red food coloring to mimic blood. -
Serve and Enjoy
Place them on a platter and serve at your Halloween party for everyone to enjoy!
Tips for Success
- Room Temperature Ingredients: Ensure that the butter and eggs are at room temperature for even mixing and a smoother batter.
- Don’t Overmix: Stir the batter just until combined to keep the cupcakes light and airy; overmixing can lead to denser cupcakes.
- Cool Completely Before Decorating: Always let your cupcakes cool completely to ensure the fondant doesn’t melt or lose its shape.
- Use Cornstarch with Fondant: If the fondant is sticky, dust your surface with cornstarch to prevent it from sticking while you shape it.
Easy Variations
- Flavored Cupcakes: Add chocolate or pumpkin spice for a seasonal twist on your cupcake base.
- Different Fillings: Consider filling the cupcakes with vanilla or chocolate pudding for an extra surprise inside.
- Alternative Decorations: Use chocolate or other edible decorations instead of fondant for a simpler approach.
- Gluten-Free Option: Substitute all-purpose flour with gluten-free flour blend for a gluten-free version.
What to Serve with Zombie Mouth Cupcakes
- Witch’s Brew Punch: A fun, colorful punch complements the spooky theme and refreshes your guests.
- Halloween Candy Corn Mix: Serve alongside your cupcakes for a festive touch and added sweetness.
- Savory Dishes: Pair them with cheesy popcorn or pumpkin soup for a nice balance of flavors.
- Ghoulish Cheese Board: Create a cheese platter that includes eerie-themed snacks like bat-shaped crackers or ghost cheese spreads.
Storage and Reheating
- Refrigerator Storage: Place cupcakes in an airtight container in the refrigerator for up to 3 days.
- Freezer Storage: Freeze unfrosted cupcakes in a single layer within a container for up to 2 months. Thaw in the refrigerator before decorating.
- Best Reheating Method: Reheat in the microwave for a few seconds to warm them slightly before serving, but avoid reheating the fondant.
- Meal Prep Note: Bake the cupcakes ahead of time and store them unfrosted till the day of your event to keep them fresh.
Common Mistakes to Avoid
- Underbaking or Overbaking: Keep an eye on your cupcakes to avoid them being too dry or gooey; start checking at the 18-minute mark.
- Not Allowing to Cool: Weighing the batter down with warm toppings can cause melting; wait until they are cooled completely.
- Skipping Liners: Always use liners; baking directly in the tin can lead to sticking and can ruin the shape and presentation.
Zombie Mouth Cupcakes: Background & Cultural Inspiration
Zombie-themed treats have become a Halloween classic, appealing to both children and adults with their playful yet eerie designs. The tradition traces back to the rise of spooky-themed parties and the popularity of horror films. The concept of using fun, edible decorations to create eerie effects makes baking a joyful and creative experience—allowing you to engage with the holiday spirit in a delicious way.
Frequently Asked Questions
Can I use a different kind of decoration?
Yes! Feel free to get creative using other candies or chocolate to create your own spooky designs.
How can I adjust the sweetness of the cupcakes?
You can reduce the sugar by 1/4 cup without significantly altering the texture. For a different flavor, consider adding cocoa powder or almond extract to enhance the taste.
Are these cupcakes suitable for freezing?
Absolutely! They can be frozen unfrosted. Just make sure to wrap them well to prevent freezer burn.
Can I make these cupcakes ahead of time?
Yes, you can bake the cupcakes a day in advance and store them well-covered in the refrigerator. Frost them right before serving.
What if I don’t have fondant?
You can substitute it with buttercream icing or use chocolate for decorations. Just keep in mind the texture and look will change slightly.
Final Thoughts
Zombie Mouth Cupcakes offer both creativity and satisfaction, making them an enjoyable baking project for anyone. Not only are they visually striking, but they also deliver on flavor, making them an excellent choice for your next Halloween celebration. Try making these delightful cupcakes, and you’ll find they bring smiles and a hint of fright to your gathering!
PrintZombie Mouth Cupcakes
Fun and delicious cupcakes perfect for Halloween gatherings, featuring creepy fondant decorations and a rich, fluffy texture.
- Prep Time: 20 minutes
- Cook Time: 20 minutes
- Total Time: 40 minutes
- Yield: 12 cupcakes
- Category: Dessert
- Method: Baking
- Cuisine: American
- Diet: Vegetarian
Ingredients
- 1 cup all-purpose flour
- 1/2 cup sugar
- 1/2 cup unsalted butter, softened
- 2 eggs
- 1/2 cup milk
- 1 teaspoon vanilla extract
- 1 teaspoon baking powder
- 1/4 teaspoon salt
- Fondant for decoration
- Red food coloring for blood
Instructions
- Preheat your oven to 350°F (175°C) and line a cupcake tin with paper liners.
- Cream together the softened butter and sugar until light and fluffy, about 3-5 minutes.
- Add the eggs one at a time, mixing well after each addition, then stir in the milk and vanilla extract.
- Mix the flour, baking powder, and salt in another bowl and whisk together.
- Combine the dry ingredients with the wet mixture, stirring until just combined.
- Fill the lined cupcake cups about two-thirds full with batter.
- Bake for 18-20 minutes until a toothpick comes out clean, then let cool.
- Decorate with fondant and drizzle with red food coloring once the cupcakes are cool.
- Serve at your Halloween party and enjoy!
Notes
Ensure room temperature ingredients for even mixing. Avoid overmixing to keep the cupcakes light. Let them cool completely before decorating.