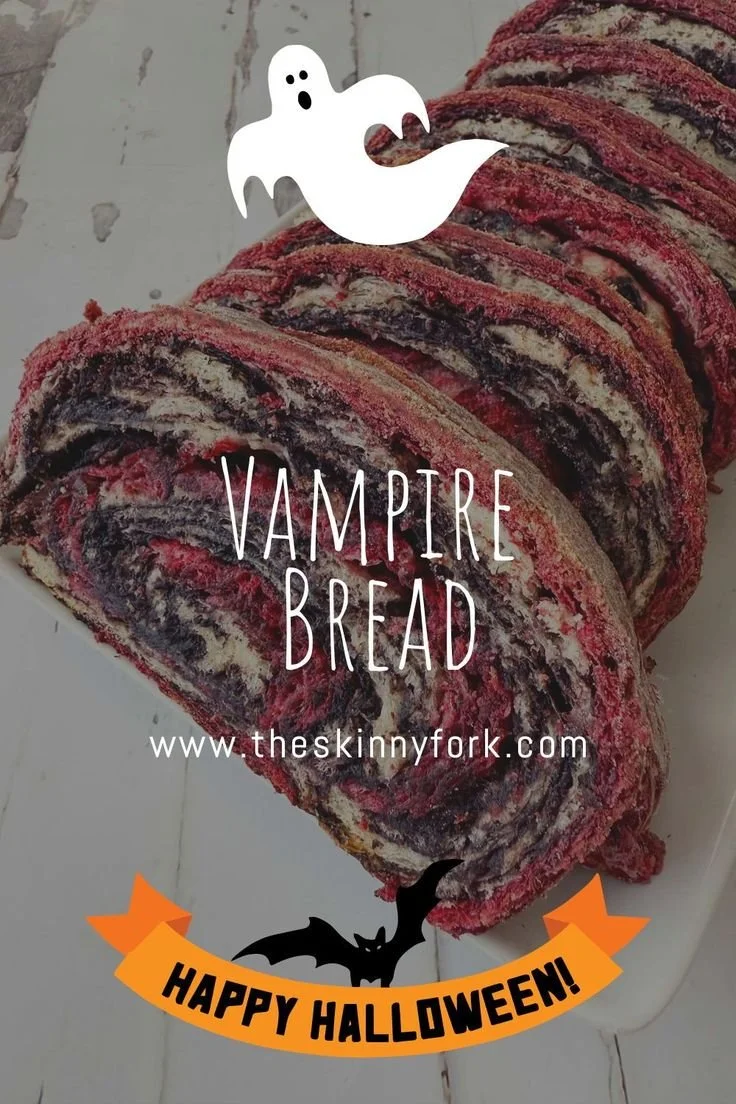
The delightful Vampire Bread is a strikingly colorful treat that’s perfect for Halloween or any fun occasion. This themed bread combines traditional techniques with a playful twist, making it not only visually appealing but also deliciously satisfying. Its soft texture and subtle sweetness will enchant both children and adults alike.
Why You’ll Love Vampire Bread
- Visually Stunning: With its vibrant color layers, this bread is as much a feast for the eyes as it is for the taste buds. It adds a festive touch to any gathering.
- Easy to Make: This recipe features straightforward steps, making it accessible for beginner bakers. You’ll be surprised at how manageable it is to create such a showstopper.
- Versatile Serving Options: Whether you serve it as a breakfast item, a playful snack, or even a dessert, this bread can adapt to any meal.
- Family Fun: Making Vampire Bread can be a fun family activity. Kids will love helping to mix colors into the dough and rolling it up.
- Impressive Treat: Serve it at parties or holiday celebrations, and you’ll impress your guests without spending hours in the kitchen.
Recipe Overview
- Prep Time: 15 minutes
- Cook Time: 30 minutes
- Total Time: 2 hours (including resting time)
- Servings: Makes 12 slices
- Difficulty Level: Easy
Ingredients You’ll Need for Vampire Bread
-
Wet Ingredients:
- 1 cup hot reduced fat milk (helps activate the yeast)
- 1 egg yolk (adds richness)
- 1 ½ tablespoons butter (for flavor and moisture)
-
Dry Ingredients:
- 3 cups all-purpose flour (the base of the dough)
- 2 ½ tablespoons sugar (for sweetness)
- 2 ¼ teaspoons active dry yeast (for leavening)
- 1 teaspoon salt (enhances flavor)
-
Coloring:
- Black and red food coloring (for the vampire theme)

How to Make Vampire Bread
1. Prepare the Milk and Egg Mixture
In a small bowl, whisk together 1 cup of hot reduced fat milk and 1 egg yolk. Microwave this mixture for about 25-30 seconds and set it aside.
2. Combine Dry Ingredients
In a large bowl or the base of a stand mixer, combine 3 cups of all-purpose flour, 2 ½ tablespoons of sugar, and 2 ¼ teaspoons of active dry yeast. Mix these dry ingredients well.
3. Create the Dough
Add the prepared milk and egg mixture, along with 1 ½ tablespoons of butter and 1 teaspoon of salt, to the flour mixture. Stir until fully combined.
4. Knead the Dough
Knead the dough by hand for about 10 minutes or use the stand mixer with a dough hook attachment for about 5 minutes. The dough should be smooth and elastic.
5. Divide the Dough
Once the dough is kneaded, divide it evenly into 2-3 pieces. Place each piece into a separate small bowl and cover with a tea towel.
6. Color the Dough
Remove one piece of dough at a time and mix in the food coloring to achieve your desired shades. Cover again with the tea towel and allow the colored dough to rise until doubled in size, about 1.5 hours.
7. Shape the Bread
After the dough has risen, punch it down and lay it out on a lightly floured surface. Divide the dough into four equal sections and add drops of your chosen food coloring to each section. Roll each piece into an 8×4-inch rectangle and stack them in your desired color order.
8. Prepare for Baking
Lightly coat the inside of a 9×5-inch loaf pan with non-stick baking spray or line it with parchment paper. Roll the stacked dough tightly from the short end into a loaf and place it into the prepared loaf pan.
9. Second Rise
Cover the loaf again with a tea towel and let it rise until doubled in size, about 1 hour.
10. Bake the Bread
Preheat the oven to 375°F. Once the dough has risen, uncover it and bake for about 30 minutes, or until it’s cooked through and golden on top.
11. Cool and Serve
Once baked, remove the bread from the oven and allow it to cool completely before slicing into 12 pieces.
Tips for Success
- Ensure your milk is hot but not boiling when preparing the dough. This will help activate the yeast effectively.
- Keep the dough covered while it’s rising to prevent it from drying out.
- If the dough feels too sticky, sprinkle in a bit more flour while kneading.
- For even color distribution, knead the food coloring thoroughly into the dough pieces before rolling.
- Use different color combinations for various occasions to customize the look of your bread.
Easy Variations
- Seasonal Colors: Use orange and black for Halloween or red and green for Christmas.
- Flavor Add-ins: Incorporate cinnamon or chocolate chips into the dough for extra flavor.
- Dairy-Free Option: Substitute non-dairy milk and vegan butter to create a dairy-free version.
- Savory Twist: Add herbs like rosemary or garlic for a savory flavored bread.
- More Layers: Create additional color layers for a more striking visual effect by dividing the dough into more pieces.
What to Serve with Vampire Bread — The Skinny Fork
- Butter and Jam: Spread on some butter and your favorite jam for a warm, delightful breakfast.
- Cream Cheese: A savory cream cheese spread pairs well against the sweetness of the bread.
- Soups: Serve alongside a warm bowl of tomato or pumpkin soup; the bread is great for dipping.
- Salad: A crisp side salad complements the soft texture of the Vampire Bread nicely.
- Muffins: Pair with sweet muffins for a fun brunch spread.
Storage and Reheating
- Refrigerator Storage: Store any leftovers in an airtight container or wrapped in plastic wrap in the fridge for up to 5 days.
- Freezer Storage: You can freeze the sliced bread for up to 3 months. Make sure to wrap each slice individually for easy thawing.
- Best Reheating Method: Reheat slices in a toaster or on a skillet to maintain their softness and flavor.
- Texture Preservation: Avoid microwaving unless necessary, as it can make the bread chewy.
Common Mistakes to Avoid
- Don’t skip the yeast activation step; it’s crucial for the dough to rise properly.
- Avoid adding too much flour during kneading, which can lead to a dense bread.
- Make sure the dough is fully covered during both rising periods to keep it moist.
- Check doneness with a toothpick or internal temperature; the bread should sound hollow when tapped.
- Be careful not to over-color the dough; a little goes a long way for vibrant layers.
Vampire Bread: Background & Cultural Inspiration
Vampire Bread brings an element of playful storytelling to baking. Bread, a staple in many cultures, often carries deeper meanings during festivities and special occasions. The tradition of incorporating themes into food often sparks creativity, especially around holidays like Halloween, where imagination rules. From the vibrant colors representing the festive spirit to the idea of sharing unique treats with loved ones, this recipe embodies fun and community. Each layer of color symbolizes life and cheer, celebrating togetherness through food.
Frequently Asked Questions
Can I use instant yeast instead of active dry yeast?
Yes, you can use instant yeast. Just add it directly to the flour without needing to activate it in warm milk.
How long can I keep the Vampire Bread in the fridge?
You can store it in the refrigerator for about 5 days, wrapped tightly to retain freshness.
Can I make this bread in advance?
Yes, you can prepare the dough a day ahead and let it rise in the refrigerator overnight. Bring it to room temperature before continuing with the recipe.
What if my bread doesn’t rise?
Ensure that your yeast is fresh, as expired yeast may not activate. Also, the rising environment should be warm and draft-free.
Can I make it gluten-free?
Yes, using a 1:1 gluten-free flour blend may work but may result in a different texture.
Final Thoughts
Vampire Bread is not just a delightful treat; it’s an experience that combines the joy of baking with festive creativity. This recipe is simple enough for beginners and offers endless opportunities for customization. Give it a try for your next celebration—it’s sure to become a favorite that friends and family will remember!