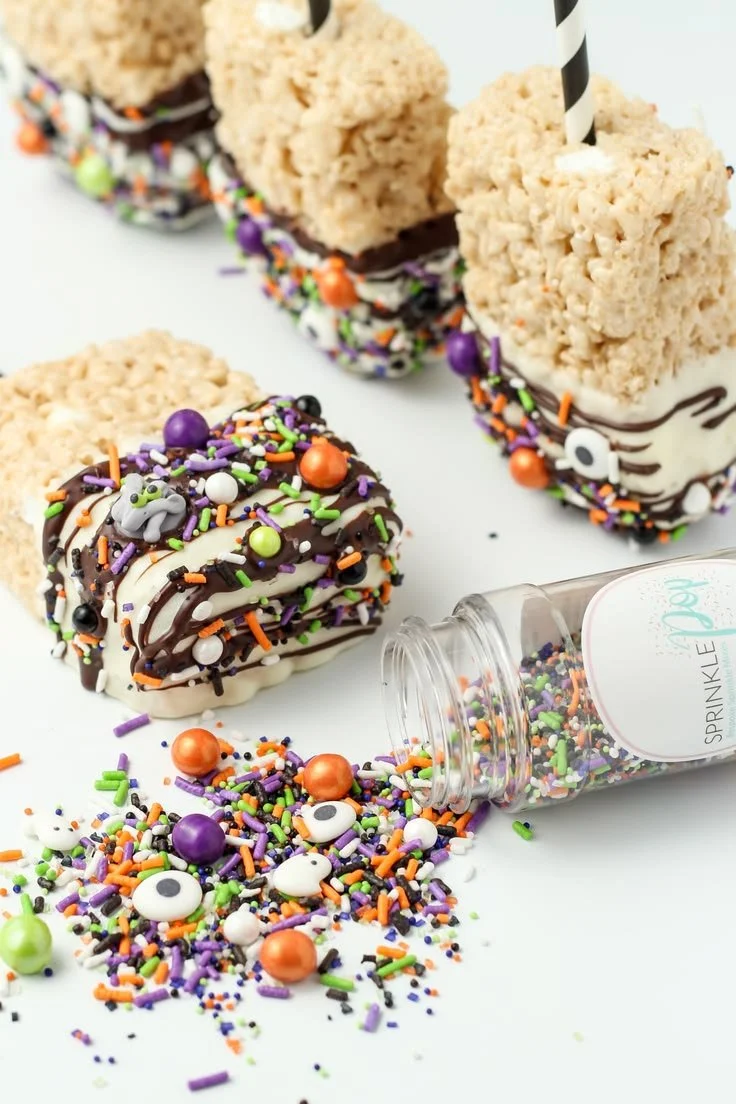
Halloween Rice Krispie Pops are a fun and festive treat that capture the spirit of the season. These delightful pops are not only easy to make but also a wonderful way to engage kids in the kitchen. With rich chocolate and colorful sprinkles, they’re perfect for parties, school events, or as a tasty Halloween snack.
Why You’ll Love Halloween Rice Krispie Pops
- Fun to Make: Get the whole family involved in creating these pops, making it a fun activity for all ages.
- Customizable: You can personalize them with different colors of chocolate and sprinkles, making each batch unique.
- Quick to Prepare: This recipe comes together in less than an hour, making it perfect for last-minute treats.
- Crowd-Pleaser: With their combination of crunchy Rice Krispies and creamy chocolate, these pops are sure to be a hit at any gathering.
- Perfect for Gifting: Wrap them in treat bags for a sweet homemade gift or party favor this Halloween.
Recipe Overview
- Prep Time: 15 minutes
- Cook Time: 10 minutes
- Total Time: 25 minutes
- Servings: 9 pops
- Difficulty Level: Easy
Ingredients You’ll Need for Halloween Rice Krispie Pops
- Rice Krispie Treats: 9 pops (9×13 pan cut into 9 rectangles) – You can use store-bought or homemade treats.
- Ghirardelli White Chocolate Melting Wafers: 2 cups – Provides a sweet, creamy coating.
- Ghirardelli Dark Chocolate Melting Wafers: 2 cups – Adds a rich contrast to the white chocolate.
- Halloween Themed Paper Straws or Sticks: For easy handling and a festive touch.
- Sprinkle Pops Monster Mashup Mix: For decoration; choose a fun mix that suits the holiday spirit.

How to Make Halloween Rice Krispie Pops
-
Prep the Workspace
Line a cookie sheet with parchment paper and set aside. This will be the surface where the pops cool and set. -
Cut the Rice Krispies
If you are using homemade Rice Krispie Treats, cut them into rectangles. Feel free to press the edges slightly to round them out if you prefer a softer look. -
Insert the Sticks
Carefully insert the Halloween straws or sticks into one side of each Rice Krispie rectangle, making sure they’re secure but not poking through the other end. -
Melt the Chocolates
Place the dark chocolate melting wafers in a microwave-safe bowl. Melt in the microwave for 1 minute, stir, then heat in 30-second intervals, stirring in between until fully melted. Repeat the same melting process with the white chocolate in a separate bowl. Be cautious not to burn the chocolate. -
Dip the Pops
Holding the Rice Krispie treat by the sides (not the stick), dip the top into your chosen chocolate, coating about one-third of the pop. Use a spoon to lift and let excess chocolate drip off for about 30 seconds. -
Add the Drizzle
Once the chocolate has set slightly (to allow for drizzling), hold the pop over the opposite colored chocolate bowl and drizzle on additional chocolate with a spoon. -
Sprinkle Decoration
Over a plate, sprinkle with the Halloween Monster Mashup sprinkles, pressing larger sprinkles into the drizzle for a festive look. -
Cool and Serve
Return the decorated Rice Krispie pops to the parchment-lined cookie sheet. Allow the chocolate to harden completely before serving. Store in an airtight container or wrap in cellophane treat bags tied with ribbon for gifting.
Tips for Success
- Use Quality Ingredients: The quality of your melting wafers significantly impacts flavor; go for Ghirardelli for the best results.
- Don’t Overheat Chocolate: Stir frequently while melting to avoid burning. Chocolate should be smooth and shiny when ready.
- Adjust Thickness: If the chocolate is too thick to easily dip, add a teaspoon of vegetable oil to thin it out.
- Timing is Key: Sprinkle the decorations while the chocolate is still slightly warm to ensure they stick.
- Experiment with Flavors: Consider adding flavored extracts (like vanilla or almond) to the melted chocolate for an extra layer of taste.
Easy Variations
- Nut Butter Coating: Dip the pops in melted nut butter or a mixture of peanut butter and chocolate for a different flavor profile.
- Colorful Chocolate: Use colored melting chocolates or candy melts to create pops in festive colors like purple or orange.
- Student-Friendly: Replace the chocolate with yogurt-covered candy melts for a lighter option.
- Add-ins: Mix in M&Ms, crushed candy canes, or other candies to the Rice Krispie mixture for a surprise crunch.
- Drizzle Variation: Use a combination of colored chocolates for drizzling to create a pattern effect.
What to Serve with Halloween Rice Krispie Pops
- Apple Slices with Caramel: The sweet crunch of apples complements the indulgent chocolate perfectly.
- Spooky Cupcakes: Pair these pops with festive cupcakes for a complete Halloween dessert table.
- Pumpkin Spice Cookies: The warmth of pumpkin spice cookies adds a seasonal touch to the treat mix.
- Hot Chocolate: Serving these pops with a warm mug of hot chocolate creates a cozy vibe perfect for fall.
Storage and Reheating
- Refrigerator Storage: Keep the Rice Krispie pops in an airtight container in the refrigerator for up to one week.
- Freezer Storage: For longer storage, freeze pops in a single layer on a parchment-lined baking sheet, then transfer to a container for up to 3 months.
- Best Reheating Method: These treats are best enjoyed at room temperature; allow frozen pops to thaw in the refrigerator overnight for optimal texture.
- Preserving Texture: Store them with parchment paper in between layers to prevent sticking.
Common Mistakes to Avoid
- Overheating Chocolate: This can cause it to seize, ruining the smooth texture. Always melt at lower power and stir frequently.
- Rushing to Decorate: If you wait too long to sprinkle the toppings, the chocolate may harden, and the sprinkles won’t stick.
- Skipping the Parchment Paper: Not using parchment can lead to sticking, making it difficult to remove the pops later.
Halloween Rice Krispie Pops: Background & Cultural Inspiration
Halloween Rice Krispie Pops are inspired by the classic Rice Krispie Treat, a beloved American snack since the 1930s. The tradition of making treats during Halloween stems from the fun of creating handmade snacks for friends and family, and this recipe adds a playful spin to a nostalgic favorite. The use of festive colors and shapes represents the playful spirit of Halloween, bringing joy to gatherings and celebrations throughout the season.
Frequently Asked Questions
Can I make these Rice Krispie Treats in advance?
Yes, you can prepare the pops a day or two in advance. Just store them properly in an airtight container.
What can I use instead of melting wafers?
You can substitute with chocolate chips, but they may require extra oil to achieve a smooth consistency.
How can I make these dairy-free?
Use dairy-free chocolate melting wafers and ensure your butter or margarine is dairy-free for the Rice Krispies.
Can I use regular straws instead of paper straws?
While you can use regular drinking straws, paper straws are sturdier and add a cute theme to the pops.
What if the chocolate hardens before decorating?
If this happens, gently reheat the chocolate in short bursts in the microwave to soften it again.
Final Thoughts
Give these Halloween Rice Krispie Pops a try for an easy, fun, and delicious treat this season. They’re not just tasty; they’re a festive way to bring family and friends together for some kitchen fun. Perfect for parties or sweet gifts, these pops are bound to be a hit wherever they go. Happy Halloween!