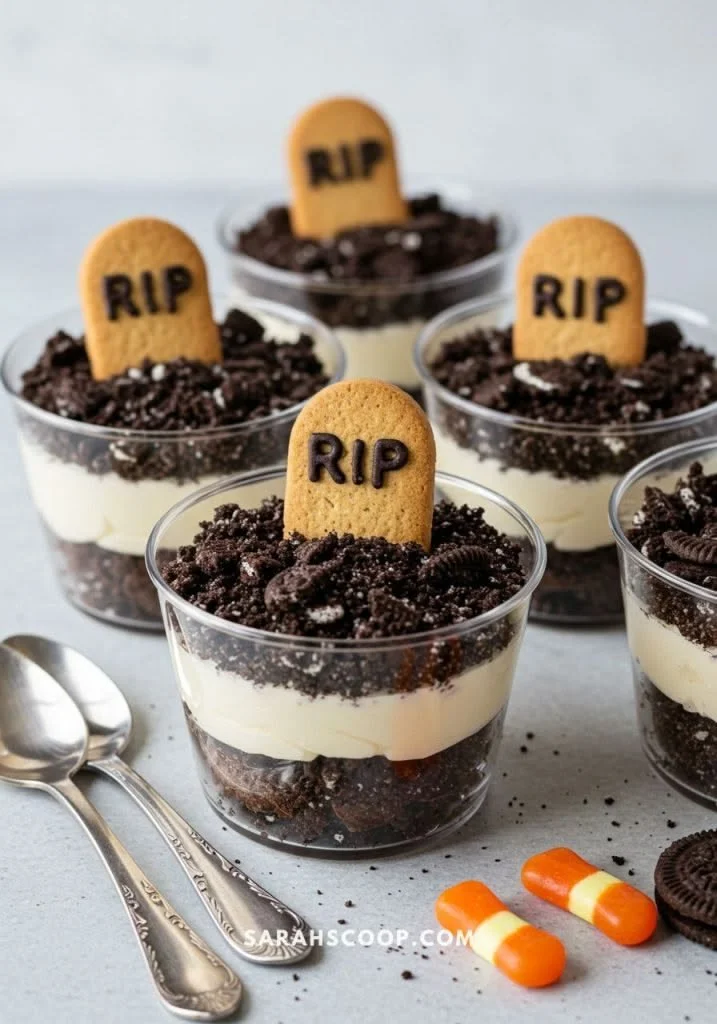
Graveyard Pudding Cups are a delightful treat that brings a touch of whimsy to any gathering. Perfect for Halloween parties or a spooky celebration, these layered cups of chocolate pudding, crushed cookies, and festive toppings are simple to make but sure to impress. Not only do they look fun, but they also deliver on flavor, making them irresistible to kids and adults alike.
Why You’ll Love Graveyard Pudding Cups
- Easy to Make: With just a few simple steps, you can whip these up in no time, making them perfect for novice bakers.
- Customizable: You can add various toppings and mix-ins to personalize each cup, allowing for creative expression.
- Fun Presentation: These eerie desserts are perfect for themed parties, providing a visually appealing treat that sparks conversation.
- Family-Friendly: Kids will love helping to assemble their own cups, making it a great activity for family bonding.
- No-Bake Dessert: This recipe requires no baking, keeping the kitchen cool and giving you more time to enjoy your festivities.
Recipe Overview
- Prep Time: 20 minutes
- Cook Time: 5 minutes (for pudding)
- Total Time: 25 minutes
- Servings: 4-6
- Difficulty Level: Easy
Ingredients You’ll Need for Graveyard Pudding Cups
- Chocolate Pudding: Prepare according to package instructions for the base of your dessert.
- Crushed Cookies (like Oreos): These will create the “dirt” layer and add a delightful crunch.
- Tombstone Candy or Cookies: These are your spooky decorations that give the cups their graveyard appeal.
- Gummy Worms (optional): For an added creepy touch, consider these wriggly fun additions.
- Whipped Cream (optional): Add on top for a creamy finish if desired.
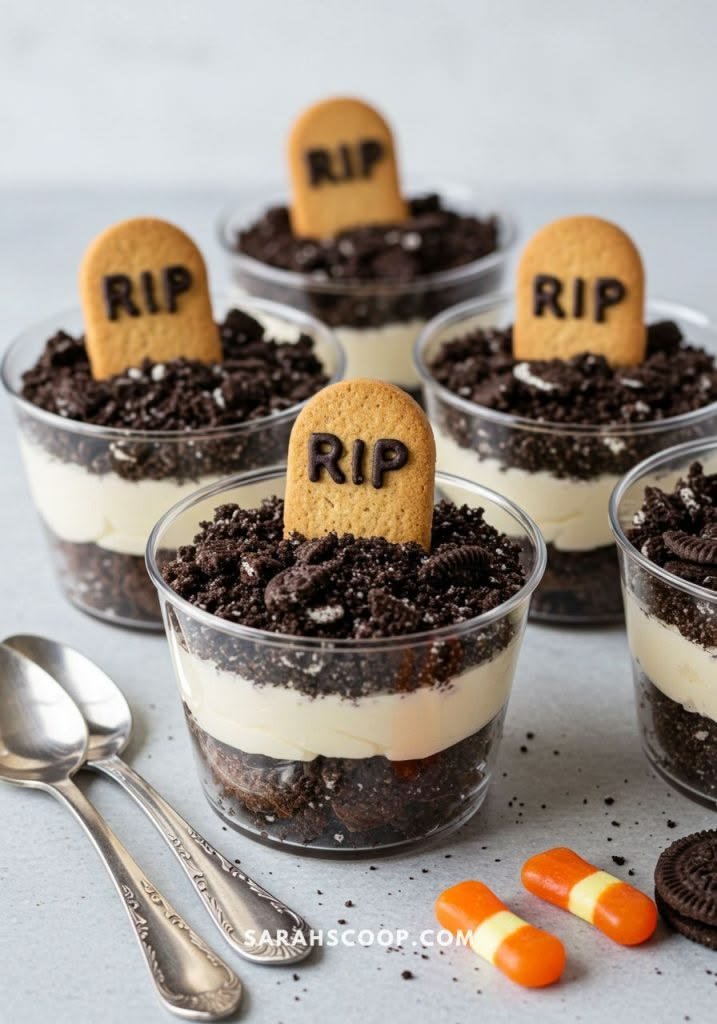
How to Make Graveyard Pudding Cups
- Prepare the Pudding: Follow the instructions on the pudding package to prepare the chocolate pudding. Allow it to cool slightly.
- Layer the Pudding: In clear cups, add a layer of chocolate pudding at the bottom, filling about one-third of the cup.
- Add Crushed Cookies: Sprinkle a layer of crushed cookies over the pudding to resemble dirt. Use enough to cover the pudding layer completely.
- Repeat the Layers: Continue adding layers of pudding and crushed cookies until the cups are filled, with cookies at the top.
- Decorate the Tops: Place tombstone candies in the cookie layer for decoration. If you’re using gummy worms, drape them over the top for the spooky effect.
- Chill and Serve: Refrigerate the pudding cups until you’re ready to serve. Enjoy your spooky dessert!
Tips for Success
- Use Quality Pudding: For the creamiest texture, use a high-quality chocolate pudding mix, and make sure to chill it properly before layering.
- Crush Cookies Evenly: You can crush the cookies using a food processor or by placing them in a zip-top bag and rolling over them with a rolling pin.
- Chill the Cups: Allow the assembled cups to chill for at least an hour before serving. This helps the flavors meld and the dessert to set properly.
- Garnish Just Before Serving: If you want the gummy worms to look fresh, add them right before serving to avoid any stickiness.
Easy Variations
- Different Pudding Flavors: Swap chocolate pudding for vanilla or even pumpkin pie pudding for a seasonal twist.
- Add Candy Layers: Sprinkle mini candy pieces like M&Ms or sprinkles between layers for added sweetness and crunch.
- Dairy-Free Version: Use dairy-free pudding and whipped topping for a dairy-free friendly option.
- Cupcake Version: Substitute the cups for clear cupcake wrappers and layer the components in a traditional cupcake format.
What to Serve with Graveyard Pudding Cups
- Spooky Cupcakes: Frosted cupcakes with Halloween-themed decorations can complement the dessert perfectly.
- Fruit Skewers: Serve fruit skewers alongside for a fresh balance to the sweet treats.
- Cheese and Crackers: A charcuterie board with cheeses and crackers can provide a savory counterpoint.
- Halloween Punch: A fun, themed drink like a spooky punch can pair well with the dessert’s festive nature.
Storage and Reheating
- Refrigerator Storage: Keep the pudding cups covered in the refrigerator for up to 3 days. However, it’s best to enjoy them fresh for optimal texture.
- Freezer Storage: Freezing is not recommended, as the pudding may alter in texture once thawed, leading to a watery consistency.
- Best Reheating Method: These are best served cold, so there is no reheating necessary.
- Meal Prep Note: You can prepare the pudding and crush the cookies ahead of time, assembling the cups closer to your serving time.
Common Mistakes to Avoid
- Not Cooling the Pudding: Serving warm pudding can cause the cookie layer to become soggy. Always let it cool before layering.
- Overcrushing Cookies: Aim for a coarse texture for the cookies; too fine will translate into dust rather than a nice dirt-like layer.
- Ignoring Chill Time: Skipping the chilling step may lead to a runny dessert; chilling helps everything set nicely.
Graveyard Pudding Cups: Background & Cultural Inspiration
Graveyard Pudding Cups celebrate the playful side of Halloween festivities. Traditionally, Halloween treats focus on fun and creativity, bringing joy to both children and adults alike. This dessert reflects the spirit of the holiday, where the boundaries of scary and sweet blur harmoniously. It draws inspiration from classic Halloween imagery while remaining approachable for all ages, making it a centerpiece for gatherings and parties.
Frequently Asked Questions
Can I make these pudding cups in advance?
Yes, you can prepare the pudding and crush the cookies a day in advance. However, it’s best to assemble the cups a few hours before serving for the freshest experience.
What is the best way to store leftovers?
Cover the pudding cups with plastic wrap or keep them in an airtight container in the refrigerator for up to three days.
Can I substitute the cookies for something else?
Absolutely! If you want a different flavor profile, try using graham crackers, digestive biscuits, or even a gluten-free cookie option.
Is there a way to make this dessert healthier?
For a healthier alternative, consider using sugar-free pudding and less whipped cream. You can also add a layer of fresh fruit for extra nutrients.
What other decorations can I use?
In place of tombstone candies, you could use chocolate ghosts, candy eyes, or seasonal sprinkles to create your unique graveyard scene.
Final Thoughts
Graveyard Pudding Cups are not just a delicious dessert; they are an invitation to have fun in the kitchen while embracing the Halloween spirit. Easy to prepare and endlessly customizable, these pudding cups make for a delightful treat that will enchant both kids and adults. Try making them for your next spooky gathering and enjoy the smiles they bring!
PrintGraveyard Pudding Cups

A fun and whimsical no-bake dessert perfect for Halloween parties, featuring layered chocolate pudding, crushed cookies, and festive decorations.
- Prep Time: 20 minutes
- Cook Time: 5 minutes
- Total Time: 25 minutes
- Yield: 4 servings
- Category: Dessert
- Method: No-Bake
- Cuisine: American
- Diet: Vegetarian
Ingredients
- Chocolate Pudding (prepared according to package instructions)
- Crushed Cookies (like Oreos)
- Tombstone Candy or Cookies
- Gummy Worms (optional)
- Whipped Cream (optional)
Instructions
- Prepare the pudding by following the instructions on the package. Allow it to cool slightly.
- Layer the pudding in clear cups, filling about one-third of each cup.
- Add a layer of crushed cookies over the pudding to resemble dirt, covering it completely.
- Repeat layering pudding and crushed cookies until the cups are filled, ending with cookies on top.
- Decorate the tops with tombstone candies and optional gummy worms for a spooky effect.
- Chill the pudding cups until ready to serve.
Notes
Use quality pudding for the best texture. Consider adding gummy worms just before serving to keep them fresh.