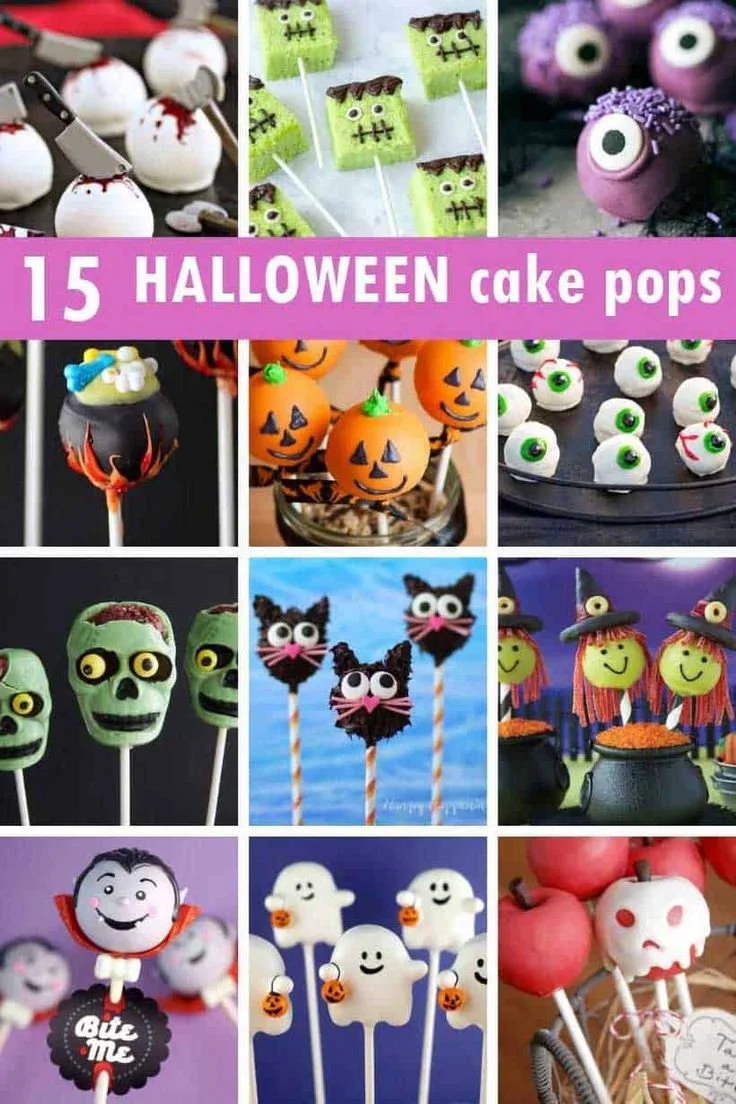
Cake pops are a festive and delightful treat, perfect for any occasion, and these 15 Halloween Cake Pops are no exception. They are fun to make and even more enjoyable to eat, bringing a touch of whimsy to your celebrations. With their colorful coatings and sprightly decorations, these cake pops are sure to become a hit at your Halloween gatherings.
Why You’ll Love Halloween Cake Pops
- Easy to Make: These treats require minimal baking and simple assembly, making them perfect even for beginners.
- Versatile Decorations: You can customize them with various Halloween-themed sprinkles and candy, allowing for endless creativity.
- Fun for the Whole Family: Making cake pops can be a fun family activity, letting everyone join in on the decorating.
- Perfect for Parties: They’re bite-sized, portable, and an excellent addition to any Halloween spread, fitting well on dessert tables.
- Great for Dancing in the Kitchen: The festive colors and flavors create a joyful cooking experience that livens up your Halloween spirit.
Recipe Overview
- Prep Time: 20 minutes
- Cook Time: 30 minutes (plus freezing time)
- Total Time: 1 hour (plus cooling)
- Servings: Approximately 24 cake pops
- Difficulty Level: Easy
Ingredients You’ll Need for Halloween Cake Pops
- Cake: 1 cake mix (any flavor)
- Frosting: 1 jar frosting (any flavor)
- Coating: Candy melts (various colors, such as orange, dark chocolate, and white for coating)
- Lollipop Sticks: Needed for creating the pops
- Decorations: Sprinkles or edible decorations (Halloween themed)
Note: You can choose to use a chocolate cake mix for a richer flavor or a vanilla mix for a lighter taste. The frosting can also be tailored to match the cake flavor for added depth.

here
How to Make Halloween Cake Pops
- Bake the Cake: Prepare the cake according to the package instructions. Allow it to cool completely on a wire rack.
- Crumble the Cake: Once cooled, crumble the cake into a large mixing bowl until it’s a fine consistency.
- Mix in Frosting: Gradually add in frosting, mixing until the texture holds together. Avoid making it overly moist; it should be moldable.
- Form Cake Balls: Roll the mixture into small balls, about 1 inch in diameter, and place them on a baking sheet lined with parchment paper.
- Freeze the Balls: Pop the baking sheet into the freezer and let the cake balls chill for about 30 minutes to firm up.
- Melt Candy Coating: While the cake balls are freezing, melt your candy melts in the microwave according to package instructions. Stir until smooth.
- Prepare Lollipop Sticks: Dip the end of each lollipop stick into the melted candy coating, then gently insert it into the center of a cake ball.
- Coat the Pops: Dip each cake pop fully into the melted candy melts, tapping gently to remove excess coating.
- Decorate: Before the candy coating sets, sprinkle with your Halloween-themed decorations or sprinkles.
- Set the Pops: To allow the coating to harden, stick the lollipop sticks into a Styrofoam block or another appropriate stand.
Tips for Success
- Cool Completely: Ensure your cake cools completely before crumbling to prevent a soggy mixture.
- Proportion Your Frosting: Start with a small amount of frosting and add gradually; it’s easier to add than to remove moisture.
- Chill Time is Crucial: Don’t skip on freezing the cake balls; this step helps maintain their shape during coating.
- Experiment with Flavors: Feel free to mix flavors like chocolate cake with vanilla frosting for a unique twist.
- Use a Candy Thermometer: If unsure about melting the candy melts, using a candy thermometer can help avoid overheating them.
Easy Variations
- Colorful Drizzle: For an extra pop, drizzle additional melted candy melts in contrasting colors over the set candy.
- Add Flavor Extracts: Incorporate extracts like vanilla or almond into the cake mix for an enhanced flavor profile.
- Limitless Themes: Use different sprinkles or themed decorations for other holidays beyond Halloween, like Christmas or birthdays.
- Dairy-Free Option: Use dairy-free frosting and cake mix to enjoy inclusively.
- Chocolate Coating: Create a chocolate shell by using dark or white chocolate instead of candy melts for a rich flavor.
What to Serve with Halloween Cake Pops
- Hot Apple Cider: The warm spices in apple cider complement the sweetness of the cake pops beautifully.
- Pumpkin Bread: Serve alongside slices of moist pumpkin bread for a delightful autumn-themed spread.
- Candy Corn: This classic Halloween candy adds extra festive flair to your dessert table.
- Halloween Cookie Platter: Pair with a tray of assorted decorated cookies for a variety of sweet options.
- Themed Fruit Plate: Consider a fruit platter with orange and black fruits, like mandarin oranges and blackberries, for a healthier touch.
Storage and Reheating
- Refrigerator Storage: Store leftover cake pops in an airtight container in the refrigerator for up to a week.
- Freezer Storage: Freeze uncoated cake balls by placing them in a single layer on a baking sheet, then transfer to a container once solid. They can last up to two months.
- Best Reheating Method: For softening before decorating, leave them at room temperature for 30 minutes rather than microwaving; this helps maintain the texture.
- Texture Preservation: For coated pops, keep them in the fridge if storing long-term to prevent softening.
Common Mistakes to Avoid
- Skipping the Freeze: Forgetting to freeze the cake balls can lead to misshapen pops during the coating phase.
- Overmixing Frosting: Adding too much frosting makes it difficult to shape the balls; focus on achieving a moldable consistency.
- Rushing the Setting Time: Not allowing enough time for the candy coating to set can result in messy pops.
- Incorrect Candy Melting: Melting candy at too high a temperature can seize it up; always use low settings.
Halloween Cake Pops: Background & Cultural Inspiration
Cake pops have gained popularity for their fun presentation and wide-reaching appeal, becoming a staple at parties and events. This treat allows for creative expression, and its origins can be traced back to various cake-decorating traditions that evolved over decades. Their festive nature aligns perfectly with Halloween, where creativity shines through in the blend of flavors and vibrant decorations. From spooky ghosts to cheerful pumpkins, cake pops embody the spirit of celebration and are often found at festive gatherings, bridging generations of baking enthusiasts in a social culinary experience.
Frequently Asked Questions
Can I use a homemade cake instead of a cake mix?
Yes, you can use homemade cake as long as it is thoroughly cooled and crumbled, just like the store-bought mix.
How do I store leftover cake pops?
Store any uneaten cake pops in the refrigerator, covered in an airtight container for up to one week, or freeze them for later.
Can I make these cake pops ahead of time?
Absolutely! You can prepare the cake balls in advance and freeze them until you’re ready for coating and decorating.
What if my candy melts won’t smooth out?
If your candy melts start to seize or clump, add a tiny amount of vegetable oil or shortening to help smooth it out.
Can I substitute the candy melts with chocolate?
Yes, you can use melted chocolate instead of candy melts for a different flavor. Just ensure it’s fully tempered for best results.
Final Thoughts
These 15 Halloween Cake Pops offer a delightful and creative way to celebrate the spooky season. They’re easy to make, delicious, and a wonderful project for families and friends. Whether you’re hosting a party or looking for a fun kitchen project, this recipe is worth trying. Get ready to watch them disappear from the dessert table!